Cocos2d 2.0 is a flexible game engine that leverages OpenGL ES 2.0 to render graphics. A developer could build many games with Cocos2d 2.0 without ever having to directly use or understand OpenGL ES 2.0. But sometimes custom OpenGL drawing is required to achieve a desired graphical effect in a game.
This article is an introduction to how to use OpenGL ES 2.0 to draw basic things such as a sound wave, the rolling hills of games like Tiny Wings, Enduro Extreme Trials, SnowXross 2, and many other effects.
Download: A sample Xcode project that was created for this article can be download here. The md5 hash for the zip file is 0ecc0d4c6a859e9d84d82e960e02288c.
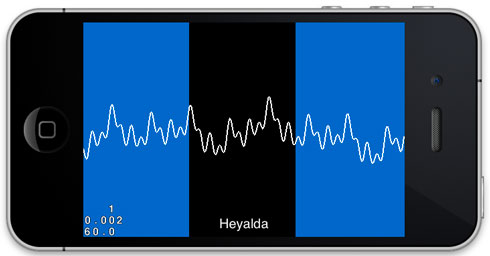
The sample project was created by starting with the basic Coco2d 2.0 template and then a CCNode subclass with custom OpenGL ES 2.0 drawing was implemented. When the project is run, a blue-green background gradient is created using a GL_TRIANGLE_STRIP draw technique and a simulated sound wave is animated using the GL_LINE_STRIP drawing technique. The following is an image showing what is seen when the app is run.

Start with a CCNode Subclass
To get started with Custom OpenGL ES 2.0 drawing in Cocos2d 2.0, it all starts with creating a subclass of CCNode. The CCNode class contains the draw method that should be overridden to perform custom OpenGL ES 2.0 drawing. The basic process of setting up a CCNode subclass to perform custom drawing is the following:
1) Create the CCNode subclass.
2) Assign a shader program to the CCNode shaderProgram property. To keep things simple, you can use one of the shader programs from Cocos2d’s CCShaderCache, or if for more advanced and interesting effects you can experiment with creating your own shader programs.
        // Must define what shader program OpenGL ES 2.0 should use.
        // The instance variable shaderProgram exists in the CCNode class in Cocos2d 2.0.
        self.shaderProgram = [[CCShaderCache sharedShaderCache] programForKey:kCCShader_PositionColor];
3) Build your data structures that define the geometry that will be drawn. In this sample program, an array of a C structures where each structure contains three floating point values for the x,y,z coordinates of each vertex is used to define the vertices and an array of the Cocoos2d data type ccColor4B which is a C structure of four GLbytes is used to define the red, green, blue, and alpha color of each vertex.
4) Override the draw method with your custom drawing code that tells OpenGL ES 2.0 which shader program to use and what geometry data to draw.
glVertexAttributePointer is called to specify the location and format of the data that will be used to define the vertices and colors in the code below. Further detail about this important function can be found here and lots of other details about OpenGL ES 2.0 can be found at The Khronos Group site.
     // Enable the needed vertex attributes.
     ccGLEnableVertexAttribs( kCCVertexAttribFlag_Position | kCCVertexAttribFlag_Color );

    // Tell OpenGL ES 2.0 to use the shader program assigned in the init of this node.
    [self.shaderProgram use];
    [self.shaderProgram setUniformForModelViewProjectionMatrix];

    // Pass the verticies to draw to OpenGL
    glEnableVertexAttribArray(kCCVertexAttribFlag_Position);
    glVertexAttribPointer(kCCVertexAttrib_Position, 3, GL_FLOAT, GL_FALSE, 0, dynamicVerts);

    // Pass the colors of the vertices to draw to OpenGL
    glEnableVertexAttribArray(kCCVertexAttribFlag_Color);
    glVertexAttribPointer(kCCVertexAttrib_Color, 4, GL_UNSIGNED_BYTE, GL_TRUE, 0, dynamicVertColors);

    glDrawArrays(GL_TRIANGLE_STRIP, 0, dynamicVertCount);
Leverage Cocos2d CCShaderCache
Cocos2d 2.0 makes custom drawing with OpenGL ES 2.o easy. Shader programs need to be written to properly setup the graphics pipeline to enable OpenGL ES 2.0 drawing. Because Cocos2d 2.0 is built on OpenGL ES 2.0, it has already done much of this work for us. Cocos2d 2.0 comes with several shader programs. Cocos2d took this even one step further by creating the CCShaderCache singleton class that caches common shader programs and makes them available for use.
The CCNode class has an instance variable and property called shaderProgram that is of the type CCGLProgram. The property is set to retain and the CCNode dealloc method releases the shader program for you. It is necessary to assign a shader program from the CCShaderCache (or create your own shader program) to the shaderProgram property so that it can be used when overriding the draw method in your CCNode subclass to do your custom drawing.
Note about performance: Cocos2d logging warns that the the GL State Cache should be enabled by defining CC_ENABLE_GL_STATE_CACHE to be 1 in the ccConfig.h file. This is recommended to gain a performance improvement if you are only going to use the Cocos2d functions ccGLUseProgram(), ccGLDeleteProgram(), and ccGLBlendFunc() and do not directly use the glUseProgram(), glDeleteProgram(), and glBlendFunc() functions.
Basic Drawing Concepts in OpenGL ES 2.0
When drawing with OpenGL ES 2.0, the drawing takes place programatically. To accomplish this, data that defines what we want to draw needs to be supplied to the OpenGL ES 2.0 C API in a one of several formats. OpenGL ES 2.0 then needs to be told what format that data is in so that it can draw it correctly.
While more advanced ways of preparing data to be handed over to OpenGL ES 2.0 do exists, these will not be discussed in this article. These techniques primarily relate to improving performance by packaging data in a manner that OpenGL ES 2.0 can more efficiently process and by leveraging frame and vertex buffer objects to offload drawing work from the CPU to the GPU.
The basic drawing process involves defining a set of vertices and colors and then passing those values along with instructions on how to process the values. While it is also possible to set uniform properties such as a single color attribute, this technique will not be discussed in this article.
For this article, the data that is passed to OpenGL is in the format of a C array of three dimensional vertex points and a C array of CCColor4B that define the color attribute for each vertex. In the sample code, HeyaldaPoint is a C structure of three floating point variables and CCColor4B is a C structure defined in Cocos2d that contains four 8-bit GLBytes.
In the sample code, the array of three dimensional vertices is called dynamicVerts and the array of color values is called dynamicVertColors.
The OpenGL ES 2.0 C api is used to pass these arrays to the drawing hardware. The GL_TRIANGLE_STRIP, GL_LINE_STRIP, GL_POINTS, and GL_TRIANGLE_FAN are some of the ways that OpenGL ES 2.0 can be told to interpret the data that it is to draw.
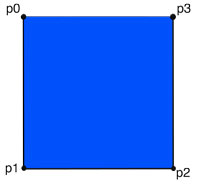
GL_TRIANGLE_STRIP – The GL_TRIANGLE_STRIP parameter value tells the drawing hardware to process the vertex data by drawing to the screen by coloring triangles. This is probably the most commonly used drawing shape for OpenGL ES 2.0 iPhone/iPad apps. Smooth curves can be created by drawing hundreds or even thousands of triangles. The following image shows how a triangle strip could be used define a rectangle. The verticies are drawn in the order p0, p1, p2, p3.
This is considered to be a counter-clockwise winding of how the points are defined because the first triangle is defined by a counter-clockwise rotation. Counter-clockwise winding defines the front of the triangle. Clockwise winding defines what would be the back of a triangle. The winding direction is only important when culling is used to only display triangles when the front of the triangle is visible. This is commonly used in 3d rendering.
The first triangle is defined by the sides p0-p1, p1-p2, p2-p0. The second triangle is defined by p1-p2, p2-p3, p3,p1.

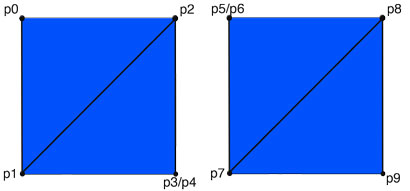
A technique that can be used to batch drawing multiple separate objects with a single array of vertices is what I call a triangle strip skip. There probably is a standard name for this technique, but I am not sure what it is called. To use it, add the last vertex on one object twice (p3 and p4) and then add the first vertex on the next object twice (p5 and p6). By double adding these points in this manner, the drawing will effectively jump from one triangle strip to the next and the objects will look separate, but can be drawn with a single OpenGL ES 2.0 draw call.
The sample code for this article uses this triangle strip skip technique in the HellowWorledLayer class. To see it in action, set the kShowTriangleStripSkip pre-processor definition equal to one. Here is a screenshot of the effect, where the rectangle on the left and right are drawn with one draw call and the triangle fan jumps invisibly from the rectangle on the left to the rectangle on the right.

Note that the color attribute applies to the vertex point. If different colors are assigned, OpenGL will create a gradient between the different color points. If you use gradients, you might want to change the pixel format in the AppDelegate from the default of kEAGLColorFormatRGB565 to kEAGLColorFormatRGBA8 to achieve a smoother gradient. This was done in the sample program for this article.
GL_LINE_STRIP – The vertices that are defined are connected by lines when this drawing method is used. This is how the squiggly white line is drawn in the above image. In the HellowWorldLayer class an update selector is scheduled. In that update method, a sum of sinusoids is created with the amplitude, frequency and phase of the signal is varied to produce a bouncing wave effect (simulating a sound wave).
GL_POINTS – Pixel points are drawn for each vertex (no image is shown in this article for this drawing technique).
GL_TRIANGLE_FAN – The first point that is drawn is a base point and then additional points are drawn to create triangles between the base point and the added points. In the following image, the vertices ware drawn in the order of p0, p1, p2, p3. When p2 is defined, a triangle with sides p0-p1 and p1-p2 and p2-p0 is created. When p3 is added, a new triangle is defined with sides p0-p2,, p2-p3 and p3-p0. I typically do not use this technique very often, but it can be useful for making a radial gradient effect.

Custom Drawing Helper Class HeyaldaGLDrawNode
The sample project contains a class called HeyaldaGLDrawNode. This class brings together the concepts discussed above into a working Xcode project to experiment with custom OpenGL ES 2.0 drawing. If you download the project, you can just run it and then dig in and experiment with it.
How to use it
To use the HeyaldaGLDrawNode class in another project, perform the following.
1) Copy the class into the desired project and add it to the desired targets.
2) Create an instance of the class.
3) Define the custom geometry and color for each vertex point using the addToDynamicVerts2D:withColor: and addToDynamicVerts3D:vert withColor: selectors.
4) Set the glDrawMode depending on how you defined your vertex geometry.
5) Add the instance of HeyaldaGLDrawNode to your Cococs2d scene graph so it will be drawn.
6) Call the setReadyToDrawDynamicVerts: selector and pass it YES to enable the custom drawing in this class.
Because each instance of the HeyaldaGLDrawNode class adds a draw call to the game, it is best to attempt to add multiple custom drawings into a single class. There are several techniques to do batch geometry into one draw call. For example, if you wanted to draw to separate objects on the screen you could use the triangle strip skip technique described above.
For performance reasons, this class could be updated to use frame buffer objects, frame buffer arrays, vertex buffer objects, and vertex buffer arrays (and some other OpenGL voodoo) in a way that the CPU can pass more of the drawing work to the GPU.
It is also possible to improve performance of this class by creating a C structure that interleaves the vertex and color structures into a single array so that the data being passed to OpenGL ES 2.0 is in the format that OpenGL needs it to be in. This can be done by creating a C structure that contains the vertex and color values.
HeyaldaGLDrawNode Class Details
Lets take a look at the HeyaldaGLDrawNode interface file.
The first thing you will find in this file are the import statement for cocos2d.h followed by a custom structure definition and an enumeration. The struct, named HeyaldaPoint, is used to define the x,y,z coordinates of each vertex point that will be defined. The tDrawMode enumeration is used to tell the HeyaldaGLDrawNode how to process the vertices that it will draw.
#import "cocos2d.h"

typedef struct {
	GLfloat x;
	GLfloat y;
	GLfloat z;
} HeyaldaPoint;

typedef enum tDrawMode {
    kDrawTriangleStrip,
    kDrawTriangleFan,
    kDrawPoints,
    kDrawLines,

}tDrawMode;
Next are the instance variables and properties for the HeyaldaGLDrawNode class.
The dynamicVerts is a C array of the HeyaldaPoint structure.
The dynamicVertColors is a C array of the ccColor4B structure defined in Cocos2d.
The dynamicVertIndex is incremented as new vertices and colors are added to the dynamicVerts and dynamicVertColors arrays.
The dynamicVertCount is the number of vertices that will be drawn. This by default matches the dynamicVertIndex.
The BOOL value shouldDrawDynamicVerts is used to prevent the draw method in the implementation file from attempting to draw the vertices before they are ready to be drawn.
@interface HeyaldaGLDrawNode : CCNode {

    BOOL                 shouldDrawDynamicVerts;

    // Dynamic Verts
    HeyaldaPoint*        dynamicVerts;

    // Color of each vert
    ccColor4B*           dynamicVertColors;

    NSInteger           dynamicVertCount;
    NSInteger           dynamicVertIndex;

    tDrawMode               glDrawMode;

}

@property (nonatomic, assign)     tDrawMode               glDrawMode;
@property (nonatomic, assign)     HeyaldaPoint*           dynamicVerts;
@property (nonatomic, assign)     ccColor4B*              dynamicVertColors;
@property (nonatomic, assign)     NSInteger               dynamicVertCount;
The last code in the interface file are the methods that are exposed to the user of the HeyaldaGLDrawNode class.
The hp3x:y:z selector is a static method to create a HeyaldaPoint given the x,y,z coordinates.
The addToDynamicVerts2D:withColor selector appends a vertex defined by a CGPoint to the dynamicVerts C array with the chosen color. Since dynamicVerts is an array of HeyaldaPoints, the z value is set to zero by default when this selector is called.
The addToDynamicVerts3D:withColor selector appends a vertex defined by a HeyaldaPoint to the dynamicVerts C array with the chosen color.
The setReadyToDrawDynamicVerts: selector is called when the the draw method in the HeyaldaGLDrawNode should execute the OpenGL draw code to draw the vertices.
+(HeyaldaPoint) hp3x:(float)x y:(float)y z:(float)z;

-(void) addToDynamicVerts2D:(CGPoint)vert withColor:(ccColor4B)color;

-(void) addToDynamicVerts3D:(HeyaldaPoint)vert withColor:(ccColor4B)color;

-(void) setReadyToDrawDynamicVerts:(BOOL)isReadyToDraw;

-(void) clearDynamicDrawArray;

@end
HeyaldaGLDrawLayer Implementation
As discussed above, the main thing that this class does is assign the shaderProgram to be used, assist with creating the vertex and color arrays, and then overrides the CCNode’s draw method.
//
//  HeyaldaGLDrawLayer.mm
//
//  Created by Jim Range on 2/13/12.
//  Copyright 2012 Heyalda Corporation. All rights reserved.
//
#import "HeyaldaGLDrawNode.h"

#define kVertCreationBlockSize 100

@implementation HeyaldaGLDrawNode

@synthesize glDrawMode;

@synthesize dynamicVerts;
@synthesize dynamicVertColors;
@synthesize dynamicVertCount;

-(id) init {
    self = [super init];
    if (self) {

        dynamicVertCount = 0;
        dynamicVertIndex = 0;

        dynamicVerts = nil;

        // Must define what shader program OpenGL ES 2.0 should use.
        // The instance variable shaderProgram exists in the CCNode class in Cocos2d 2.0.
        self.shaderProgram = [[CCShaderCache sharedShaderCache] programForKey:kCCShader_PositionColor];

        glDrawMode = kDrawTriangleStrip; // Default draw mode for this class.

        ccGLEnableVertexAttribs( kCCVertexAttribFlag_Position );
        ccGLEnableVertexAttribs( kCCVertexAttribFlag_Color );

    }
    return self;
}

-(void) dealloc {

    [self clearDynamicDrawArray];

    [super dealloc];
}

-(void) setReadyToDrawDynamicVerts:(BOOL)shouldDraw {

    shouldDrawDynamicVerts = shouldDraw;

}

// Called to release the memory of the dynamic verts and reset this class to its default state.
-(void) clearDynamicDrawArray {
    shouldDrawDynamicVerts = NO;

    if (dynamicVerts != nil) {
        free(dynamicVerts);
        free(dynamicVertColors);
        dynamicVerts = nil;
        dynamicVertColors = nil;
        dynamicVertCount = 0;
        dynamicVertIndex = 0;
    }

}

// Adds a vertex point with the zVertex p.z set to zero and assignes its color.
-(void) addToDynamicVerts2D:(CGPoint)vert withColor:(ccColor4B)_color {

    HeyaldaPoint p;
    p.x = vert.x;
    p.y = vert.y;
    p.z = 0;
    [self addToDynamicVerts3D:p withColor:_color];

}

// Adds a 3D vertex point to the dynamicVerts array and the color of that vert to the dynaicVertColors array.
-(void) addToDynamicVerts3D:(HeyaldaPoint)vert withColor:(ccColor4B)vertexColor {

    // Create vertex blocks in sizes of 100 so that memory allocation only needs to
    // be done 1/kVertCreationBlockSize times as often as the verts are added.

    NSInteger remainder = dynamicVertCount % kVertCreationBlockSize;
    NSInteger vertBlockCount = dynamicVertCount / kVertCreationBlockSize + 1;
    if (remainder == 0) {
        dynamicVerts = (HeyaldaPoint*)realloc(dynamicVerts, sizeof(HeyaldaPoint) * kVertCreationBlockSize * vertBlockCount);
        dynamicVertColors = (ccColor4B*)realloc(dynamicVertColors, sizeof(ccColor4B) * kVertCreationBlockSize * vertBlockCount);
    }

    // Increment so that the index always points to what will be the next added vert/color pair.
    dynamicVertColors[dynamicVertIndex] = vertexColor;
    dynamicVerts[dynamicVertIndex++] = vert;

    //  NSLog(@"created vert:(%.2f,%.2f,%.2f) withColor:r:%d,g:%d,b:%d,a:%d", vert.x, vert.y, vert.z,
    //  vertexColor.r, vertexColor.b, vertexColor.b, vertexColor.a);

    dynamicVertCount = dynamicVertIndex;
}

-(void) draw {

    // Only draw if this class has the verticies and colors to be drawn setup and ready to be drawn.
    if (shouldDrawDynamicVerts == YES) {

        // Enable the needed vertex attributes.
	ccGLEnableVertexAttribs( kCCVertexAttribFlag_Position | kCCVertexAttribFlag_Color );

        // Tell OpenGL ES 2.0 to use the shader program assigned in the init of this node.
        [self.shaderProgram use];
        [self.shaderProgram setUniformForModelViewProjectionMatrix];

        // Pass the verticies to draw to OpenGL
        glEnableVertexAttribArray(kCCVertexAttribFlag_Position);
        glVertexAttribPointer(kCCVertexAttrib_Position, 3, GL_FLOAT, GL_FALSE, 0, dynamicVerts);

        // Pass the colors of the vertices to draw to OpenGL
        glEnableVertexAttribArray(kCCVertexAttribFlag_Color);
        glVertexAttribPointer(kCCVertexAttrib_Color, 4, GL_UNSIGNED_BYTE, GL_TRUE, 0, dynamicVertColors);

        // Choose which draw mode to use.
        switch (glDrawMode) {
            case kDrawTriangleStrip:
                glDrawArrays(GL_TRIANGLE_STRIP, 0, dynamicVertCount);
                break;

            case kDrawLines:
                glDrawArrays(GL_LINE_STRIP, 0, dynamicVertCount);
                break;

            case kDrawPoints:
                glDrawArrays(GL_POINTS, 0, dynamicVertCount);
                break;

            case kDrawTriangleFan:
                glDrawArrays(GL_TRIANGLE_FAN, 0, dynamicVertCount);
                break;

            default:
                glDrawArrays(GL_TRIANGLE_STRIP, 0, dynamicVertCount);
                break;
        }

     }

}

// Static method to generate a 3d vertex.
+(HeyaldaPoint) hp3x:(float)x y:(float)y z:(float)z{
    HeyaldaPoint p;
    p.x = x;
    p.y = y;
    p.z = z;
    return p;
}

@end
Q:Doesn’t Cocos2d 2.0 already have custom OpenGL ES 2.0 Drawing code in CCDrawPrimities.h? A: Yes, but each call to one of the CCDrawPrimitives requires one OpenGL draw call; this is inefficient.
