

Here are the basic steps to get up and running with an Eclipse Cocos2d-x development environment.
1) Download the latest version of Eclipse IDE for Java Developers. At the time of this writeup it was Eclipse Luna.
General link to download Eclipse to see various types of Eclipse that are available: https://www.eclipse.org/downloads/
2) Download the Android Stand-alone SDK Tools: https://developer.android.com/sdk/installing/index.html?pkg=tools
3) Download the Android NDK and place it where you want to keep it on your system. You will then need to open Terminal on Mac, chmod 755 android-ndk-r10e-darwin-x86_64.bin to make the file executable, and then type ./android-ndk-r10e-darwin-x86_64.bin on the command line to extract the Android NDK.
4) Unzip the Android Stand-alone SDK Tools to a location you would like to keep them on your system.
5) Install the desired Android SDK API version(s) you would like to use. To do this, go into the unzipped folder and then into the tools folder from above and on a command line execute ./android update sdk. This will launch the Android SDK Manager so that you can select which Android SDK versions you want to install. I generally install the latest production version (e.g. API 22) and API 13, which is the minimum I support.
Note
I chose to target the minimum version that supports Google Play Game Services and some other Ad Networks that I use. This is API 13 (Android 3.2).
I also install the latest version at the time of this writeup, API 22.
To view the older versions, i.e. API 13, put a check mark next to the obsolete radio button at the bottom of the SDK Manager.
Since I use Google Play Game Services and the Google Play Billing Library, I also install those latest versions.
6) Click Install Packages, accept the license agreement, and then click Install.
7) Install Ant. The easiest way to do this is to go to the Homebrew site and first install Homebrew. Then you can easily install Ant executing this from Terminal: brew install ant
8) Open Eclipse and select a location where you will save your workspace.
9) In Eclipse, click on Help -> Install New Software -> Add
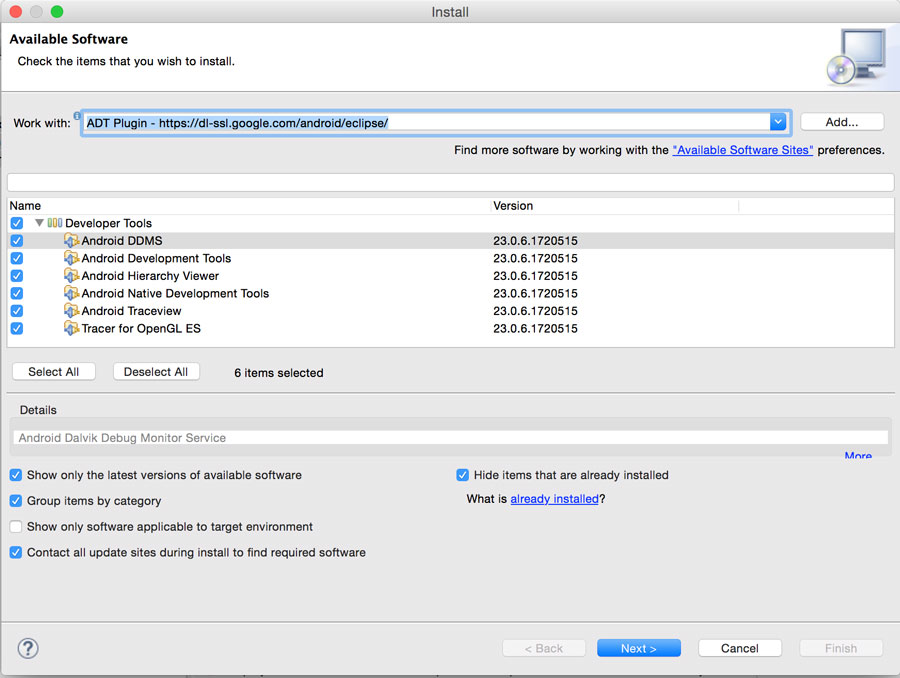
10) Enter the https repository location for the Android plugin: https://dl-ssl.google.com/android/eclipse/ and then give this repository a name for your reference. You can choose ADT Plugin for the name.
11) Select the checkbox next to developer tools and then click next and finish. Review the license agreement and if you agree then do so and finish the install process. The install progress can be seen in ![]() the bottom right corner of Eclipse. When it completes, then restart Eclipse.
the bottom right corner of Eclipse. When it completes, then restart Eclipse.
12) After restarting Eclipse, you will need to define where your Android SDK is located. This is the location of the stand-alone sdk tools that you unzipped above. You should be prompted for this location. You can also define this by clicking on Eclipse -> Preferences -> Android and then enter the path to the SDK in the SDK Location field.
13) Download and unzip Cocos2d-x 3.8.1 or newer.
14) Setup Cocos2d-x by executing python setup.py from inside of the unzipped Cocos2d-x folder. You will need to point out where your Android SDK folder, NDK folder, Ant and Cocos2d-x root are located. You can run setup.py multiple times if need be to verify that the setup script properly set the system variables for:
- COCOS_CONSOLE_ROOT
- COCOS_TEMPLATES_ROOT
- NDK_ROOT
- ANDROID_SDK_ROOT
- ANT_ROOT
After setup completes and you verified that all paths are setup, you will then need to execute source /MY_PATH/TO/.bash_profile to make the new settings active in the open terminal. Alternatively, you could just close Terminal and open a new one to make the settings take effect.
If you move any of the folders pointed to by the above system variables, you will need to run setup.py again to update their location. Alternatively, you could manually edit the .bash_profile to point to the correct locations.
Also note that each time you upgrade Cocos2d-x you will want to run setup.py from the new cocos2d-x folder and be sure that each system variable in your .bash_profile reference the correct folders.
One useful trick is to drag the folder where each is located from Finer into Terminal. But be careful to remove any trailing spaces that are added when doing this. For some reason, and extra space is usually added at the end of the path when using this technique to save you from typing the path.
15) Add the Android tools and NDK root paths to your system path variable. To do this, open ~/Users/YOUR_USER_NAME/.bash_profile and add the following to the file. Be sure to add these below the definition of ANDROID_SDK_ROOT and NDK_ROOT. You will want to have these locations in your system PATH variable so that you can easily use the ant, android, and other tools from the command line.
You can copy and paste these lines into your .bash_profile. To do this, in Terminal execute vi ~/.bash_profile, then press a to insert text, and then scroll to the bottom, and an extra line break and then press CMD-V to paste the following text. Then press esc and then press SHIFT : to type a colon and then type a w followed by the enter key. Then press SHIFT : to type a colon followed by a q and then the enter key.
export PATH=$PATH:$ANDROID_SDK_ROOT/tools
export PATH=$PATH:$ANDROID_SDK_ROOT/platform-tools
export PATH=$PATH:$ANDROID_SDK_ROOT/build-tools
export PATH=$PATH:$NDK_ROOT
16) Create a new Cocos2d-x project by executing:
cocos new MyGameName -l cpp -p com.myCompany.gameName -d PathToSaveMyGame
17) From Terminal, change directories to the PathToSaveMyGame and then execute the following to build and run the Android version of the game on an external device connected via USB. I have had endless problems trying to get the Android simulator to work properly with OpenGL games. So you I strongly recommend that you use an Android device to develop and test your games.
cocos run -p android -m debug
You can replace debug in the above command with release to build and run the Android release version.
This build process will take anywhere from about 3 minutes on a high-end mac to about 20 minutes on an older or less powerful mac.
18) Open Eclipse and select a location for your new workspace. I usually like to select the MyGameName folder that was created in the above step for the workspace location.
19) In Eclipse, right click on the Package Explorer, select Android -> Import and then choose Existing Android Code Into Workspace.
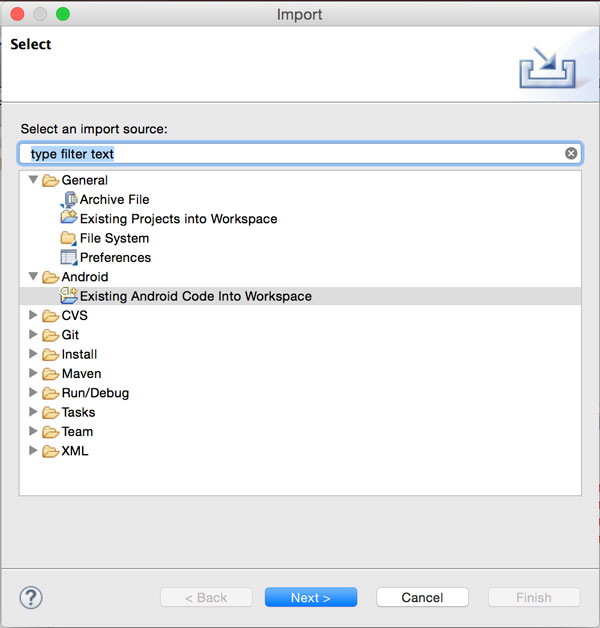
20) Select the path MyGameName/cocos2d/cocos/platform/android/java. Then deselect the controller project if you do not intend to use it and import the Cocos2d-x project.
21) Repeat the project import process for your game project located at MyGameName/proj.android.
22) Right click on your project name and select Run As -> Android Application. Note that this only runs the project. The CDT C++ tools have been disabled in the proj.android since Cocos2d-x 3.4. You can build and deploy your project directly using the console command cocos run -p android from within your proj.android folder.
Tips
+ Always use cocos run -p android -m debug [or release] to from within your game folder to run your android game. Cocos2d-x is no longer compatible with the CDT build process in Eclipse.
+ Use Eclipse for Java source editing and Java libraries. For all other C++ editing, use Xcode or Visual Studio.
+ Right click on project -> properties to view project properties
+ Right click on projects in your workspace and close the project so that it won’t be updated on launching eclipse.
+ Properties->Android is where you configure library dependancies.
+ Properties->Java Build Path is where you ad external libraries. But you can also edit the .classpath file directly when Eclipse is not open to declare external libraries.
+ When you see strange issues with errors, Google Search the error. There are lots of common issues.
+ At the time of this writeup, Cocos2d-x support for Eclipse is dwindling, Android Studio and other options such as Visual Studio 2015 are not mature enough to be what I would consider production ready for Android game development.
+ Most issues have to do with the project -> properties -> Android settings or the Project -> Properties -> Build Path settings.
+ Sometimes the only thing that seems to fix Eclipse Cocos2d-x issue is to remove all projects from the workspace and then re-add them.
For more information about the Android Developer Tools visit the developer.android.com at https://developer.android.com/sdk/installing/index.html?pkg=tools